3D Room Planner: Design Your Space Efficiently
Introduction to 3D Room Planners
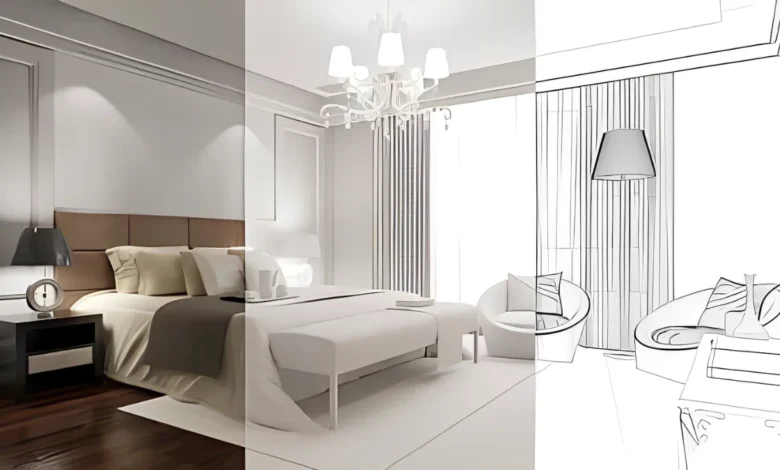
A 3D Room Planner is a powerful tool that allows you to visualize and design your space efficiently. It provides a virtual platform where you can create, modify, and rearrange your room’s layout, furniture, and decor elements. With its user-friendly interface and advanced features, a 3D room planner transforms your design ideas into reality, helping you make informed decisions before implementing any changes in your physical space.
Benefits of Using a 3D Room Planner
Using a 3D room planner offers numerous benefits that enhance your overall design experience. Firstly, it eliminates any guesswork by providing realistic renderings of your room, enabling you to see how different elements will fit together. Additionally, it saves you time and money by allowing you to experiment with various design options virtually, reducing the need for costly trial and error. Moreover, it serves as a communication tool, enabling you to share your design concepts with professionals, friends, or family members easily.
How 3D Room Planners Facilitate Efficient Space Design
Efficient space design is crucial for creating a harmonious and functional environment. A 3D room planner facilitates this process by providing a comprehensive toolkit that supports you at every stage of the design journey. It allows you to accurately determine room measurements and dimensions, experiment with different furniture arrangements, explore color schemes, and test lighting options. By providing these features, a 3D room planner ensures that every element in your space is well-thought-out and purposefully placed, resulting in a more efficient use of the available area.
Getting Started with a 3D Room Planner
To begin your design journey with a 3D room planner, you must familiarize yourself with the software interface and its functionalities. Here’s a step-by-step guide on how to get started:
A. Understanding the Software Interface
- Features Overview:
- Take some time to explore the various features and tools available within the 3D room planner. Familiarize yourself with options like room shape customization, furniture selection, color and texture customization, and lighting adjustments.
- Navigating the User Interface:
- Spend some time understanding how to navigate through the software, zooming in and out, rotating the view, and switching between different angles. This will enable you to have a comprehensive understanding of your design from various perspectives.
- Input room measurements and dimensions:
- Begin by inputting the exact measurements and dimensions of your room. Ensure accuracy, as this information will be the foundation of your virtual space.
B. Starting a Project
- Selecting Room Shape and Size:
- Choose the appropriate room shape and size that closely match your actual space. This step sets the boundaries for your design project.
- Adding Walls, Doors, and Windows:
- Customize the room layout by adding walls, doors, and windows to accurately reflect your physical space. This helps you visualize the traffic flow and natural lighting within the room.
- Configuring Lighting and Background Options:
- Experiment with different lighting setups and background options to create the desired ambiance in your virtual room. Adjust the brightness, shadows, and reflections to accurately mimic the real-world lighting conditions.
C. Exploring Design Options and Customizations
- Selecting furniture and decor items:
- Browse through a vast library of furniture and decor items to find pieces that fit your style and needs. Experiment with different combinations to create a layout that maximizes both functionality and aesthetics.
- Experimenting with Different Colors and Textures
- Play around with different color schemes and textures to see how they transform the look and feel of your space. This allows you to find the perfect balance and harmony within your virtual room.
- Personalizing the space with accessories:
- Add personal touches to your design by incorporating accessories like artwork, rugs, curtains, and plants. These elements help elevate the overall ambiance and reflect your unique personality.
Optimizing Space Layout and Functionality
Efficiently designing your space goes beyond aesthetics; it involves optimizing traffic flow, storage solutions, and natural lighting. Here are some key considerations:
A. Evaluating Traffic Flow
- Analyzing Room Entrances and Exits:
- Consider the location of room entrances and exits to ensure smooth and uninterrupted movement throughout the space. Avoid placing furniture or obstacles that impede traffic flow.
- Considering Furniture Placement for Easy Movement:
- Arrange furniture with functionality in mind. Ensure that there are clear pathways and that seating areas provide easy access to other parts of the room. This encourages convenient movement and interaction within the space.
- Designing functional zones within the room:
- Divide the room into functional zones based on your specific needs. Create separate areas for dining, working, lounging, and entertaining. This allows for efficient use of the available space and promotes optimal functionality.
B. Utilizing Space for Storage Solutions
- Incorporating built-in cabinets and shelving:
- Maximizing storage is essential in any space. Integrate built-in cabinets and shelving units to efficiently organize your belongings and keep the room clutter-free. Utilize vertical spaces to maximize storage potential.
- Maximizing Vertical Storage Options:
- Utilize the vertical space by incorporating tall bookshelves, floor-to-ceiling cabinets, and wall-mounted storage units. This helps maximize storage capacity while utilizing often overlooked areas.
- Exploring Creative Storage Solutions:
- Think outside the box and explore creative storage solutions like storage ottomans, hidden compartments, and multi-functional furniture. These innovative ideas optimize the use of space and keep your room organized.
C. Enhancing Natural Lighting and Ambiance
- Considering Window Placement for Optimal Light:
- Position windows strategically to maximize natural light. Keep in mind the room’s orientation and the times of day when sunlight enters the space. This helps create a bright and inviting atmosphere.
- Using Mirrors to Reflect Light and Create Illusion:
- Place mirrors strategically to reflect natural light and make the room appear larger. The reflections will add depth and create an illusion of spaciousness.
- Incorporating Lighting Fixtures to Set the Mood:
- Choose lighting fixtures that complement the room’s overall design and ambiance. Experiment with different types of lighting, such as overhead lights, task lighting, and accent lighting, to create the desired mood.
Adding Personal Touches and Finishing Touches
A well-designed space is a reflection of your personal style and preferences. Here’s how you can infuse your unique touch:
A. Incorporating Personal Style and Preferences
- Integrating Personal Collections and Hobbies:
- Showcase your personality by integrating personal collections or hobbies within the room. Whether it’s displaying artwork or incorporating elements of your favorite hobby, these personal touches create a sense of belonging.
- Adding artwork and decorative elements:
- Hang artwork, photographs, or decorative elements that resonate with you. This not only adds visual interest but also adds character and tells your story.
- Harmonizing the Design with Existing Home Aesthetics:
- Ensure that the design of your virtual room aligns with the overall aesthetics of your home. Consider existing architectural features, color palettes, or design motifs, and integrate them into your virtual space for a cohesive look.
B. Reviewing and Adjusting Design Choices
- Evaluating the Overall Balance and Proportions:
- Step back and assess the overall balance and proportions of your virtual room. Ensure that furniture placement, color choices, and decor items are harmonious and visually pleasing.
- Assessing Color Schemes and Textile Selections:
- Fine-tune your design by evaluating color schemes and textile selections. Consider how different colors and textures interact with each other and adjust as necessary to achieve the desired atmosphere.
- Addressing any conflicting design elements:
- Identify any conflicting design elements that disrupt the overall flow or cohesiveness of the space. Make necessary adjustments by rearranging furniture, changing color schemes, or removing unnecessary elements.
C. Refining the Design with Feedback and Collaboration
- Seeking feedback from family and friends:
- Share your virtual room design with family and friends and seek their feedback. Their fresh perspectives and insights may help you identify areas for improvement or offer new ideas.
- Collaborating with Interior Design Professionals:
- Consider collaborating with interior design professionals for expert advice. Their experience and knowledge can guide you in refining your design and helping you achieve outstanding results.
- Incorporating Feedback into Final Design Iterations:
- Take the feedback received and incorporate it into your final design iterations. Continuously refine and improve your design based on the insights and suggestions provided.
Summary and FAQs
A. Summary of Key Points
In conclusion, a 3D room planner is a valuable tool that significantly enhances your space design experience. It allows you to visualize your ideas, experiment with different elements, and optimize the functionality and aesthetics of your room. By utilizing its features, you can efficiently design your space while incorporating personal touches and achieving a harmonious, well-balanced environment.
B. Frequently Asked Questions (FAQs)
- Can I use a 3D room planner on my smartphone? Yes, many 3D room planners offer mobile applications compatible with smartphones, allowing you to access and create designs conveniently on the go.
- Is it possible to import existing furniture and decor items into the planner? Some 3D room planners offer libraries where you can import existing furniture and decor items. Check the software’s features and see if it supports this function.
- Can I save multiple design options for the same room? Most 3D room planners allow you to save multiple design options for the same room. This enables you to compare different layouts and styles before making a final decision.
- How accurate are the measurements and dimensions provided by the planner? The measurements and dimensions provided by a 3D room planner are usually accurate, but it’s always best to double-check and verify with physical measurements to ensure precision.
- Are there any limitations or restrictions while using a 3D room planner? The limitations and restrictions of a 3D room planner vary depending on the software. Some may have restricted furniture options or limited customization features. It’s important to consider these limitations when choosing a 3D room planner that aligns with your specific requirements.
Read more: Standard Bedroom Size: Ideal Dimensions for Your Space
Remember, the key to efficient space design lies in utilizing the right tools and taking the time to plan and visualize. With the help of a 3D room planner, you can transform your space into a functional and visually stunning environment that reflects your personal style and maximizes every inch of available space. So, unleash your creativity, explore the possibilities, and design your dream room efficiently!